How to connect eedomus with Aqara door and window sensor

Autor smartai | 19 Sep, 2019
It is no longer a secret for anyone, home automation is gradually integrating our home, and helps us on a daily basis to make our lives easier. Home automation can play an important role in comfort and safety, but also in reducing our energy consumption and thus reducing our bills.

Imagine an sensor on your window, which would be able to turn your heating off or on. This is now possible thanks to the Aqara door or window sensor, via the eedomus smart hub. Follow this guide, which will explain how to add your component to your eedomus smart hub. You will also find the presentation of the scenario creation following the presentation of adding devices.
Aqara door or window sensor overview
The Aqara door or window sensor can detect the opening and closing of a door or window and send a notification to your phone via the Application. With the ability to work with other Xiaomi smart devices such as the gateway, smart bulb, etc., this sensor is able to help you create a smart home. The sensor consists of a sensor and a magnet. It detects the opening and closing of doors and windows by detecting the proximity and separation of the sensor and magnet.

Here are the sensor's features:
  • Power supply: CR1632 battery
  • Communication: ZigBee
  • Maximum detection distance: 22mm
  • Operating temperature: 0-40°C
  • Dimensions: 4 x 2.1 x 1.5cm (Main part) 2.5 x 1 x 1cm (Magnet)
  • Weight: 160 g

Aqara door or window sensor configuration
For this presentation, you will need a Zigate dongle using Zigbee technology, plugged directly into the USB port of your eedomus hub. If you have not connected your dongle to your home automation box, please consult our following article: Presentation of the zigate dongle.

If your Zigate dongle is correctly connected to your eedomus home automation box, we can start adding devices.

First of all, go to the home page of your eedomus box. Then click on <<<configuration>>> at the top right of your screen. 

You will then arrive on the configuration page of your system. First, click on the logo of your eedomus box. Then, you will see appear below, <<<configure>>. Then click on it to continue your configuration.

Once you have reached the configuration tab of your eedomus hub, you will find in the Zigate part <<<Permit Join>>. Click on it, then press the sensor reset button once.

A notification will appear at the top of the screen that will allow you to add your sensor. All you have to do is click on <<<create it automatically>>.

After clicking on <<<create it automatically>>, a tab will appear on your screen, asking you if your device is controllable. In this presentation, the device is a door and window sensor. Then click on <<<no>>>.

You will then arrive at the configuration part of your device. For the configuration part, you must indicate the name, usage and define a part for your component. Once you have entered its data, click on <<<save>> to validate the addition of your component.

There you go. You now know the methodology for adding Zigbee devices to your eedomus hub. Be aware that the principle is the same for any other Zigbee device that you may want to add to your eedomus hub.

Scenario creation
Following the presentation of the sensor, you will find below, the steps detailing the procedure to follow to create a scenario. We will take as an example for this scenario, the activation or deactivation of an intelligent wall socket depending on the state of our door and window sensor, which we will imagine as being fixed to our window. The objective is to automatically turn off the heating when the window is open, to reduce energy consumption. It is important to remember that there are many possibilities in creating the scenario, all you need is another device in addition to your detector.

To create your scenario, go to the device configuration menu. Click on your previously added device, then click <<<configure>>>.

You will then be taken to the configuration page of your device. At the top of your screen, you will find <<< associated rules>>. Then click on it.

Once you are in the associated rules page, click on <<<New rule>> to access the creation of your rule.

After clicking on new rule you will be taken to the configuration tab of your rule. In the same way as when adding a device as described above, you only need to enter a scenario name, a criterion and an action that will be performed according to the criterion. Then click on <<<saving>> to validate your scenario. Your scenario is created, so be aware that this scenario creation procedure is valid for any other scenario you will create later.

Our impressions
Thanks to the Aqara door and window sensor, you now have access to a security and energy saving system depending on how your detector is used. Take advantage of its benefits to reduce your energy bills and leave your home without worrying.

Source: Tapatalk.com

Aqara temperature sensor review

Autor smartai | 30 Avg, 2019
Hello today I will present you an Aqara temperature sensor that I obtained from my partner to be able to test what it is worth comparing to my probes already in place. As I was telling you, I will try to buy as many sensors as I can from Aqara to complete my little bible and if possible to show you the feedback in Jeedom.

The Aqara temperature sensor can be used very well to indicate the temperature in a room as well as outside but under shelter because it is not waterproof but sheltered it can make a very good thermometer.

I just put the one in the bathroom a few weeks ago to see how he reacts, and he only reports back when the value changes so it's pretty convenient.
 Image result for aqara temperature and humidity sensor
Here are the technical specifications
  • Brand: Aqara.
  • Model: Temperature/humidity sensor.
  • Temperature range: from -20°C to +60°C.
  • Temperature accuracy: ±3°C.
  • Humidity accuracy: ± 3%.
  • Weight: 15 Grams.
  • Battery: CR1632 button cell.
Concerning the packaging, we can see that we are dealing with Aqara in all its splendour with a very sober white cardboard box.

On the back part we find some characteristics but everything is in Chinese but we can see its temperature range and humidity range.

In the contents of the box we find:
  • The temperature/humidity sensor.
  • The double-sided sticker for fixing.
  • The user manual.

As you can see I put the Aqara temperature sensor next to a two euro coin and this one is slightly bigger but really not much so as I told you, it will be done really very discreet.

The sensor itself, there is a small hole on the front panel that is none other than the LED on top, just below the temperature logo. There are also small grids that allow moisture and temperature to pass through. It is not visible in the picture but on the top of the sensor is a small button allowing its inclusion in the Gateway.

Once opened, by turning it slightly with a coin, you can notice the location of the CR1632 battery.

Connect Aqara temperature sensor in Mi Home
As you could see in my previous article HERE, the inclusion is really very easy, a bit like any inclusion under any home automation box with any protocol.

To do this, simply go to the Mi Home app and go to the Gateway. Now select the "Sensor". As you can see, the "Sensor" section contains a whole bunch of sensors that you can add later. Choose the "Temperature & Humidity Sensor". The inclusion procedure starts immediately. You have 30 seconds to include the sensor by pressing the small button for 5 seconds on the sensor diameter. Meanwhile, the indicator light on it lights up in blue.

Once it has been included, he asked you to choose a "name" and the room in which it will be assigned. You can then change the name and the room because as you can see, I originally assigned it to the kitchen but all things considered it just ended up in the bathroom.

A congratulatory message informs you that the inclusion procedure has gone well. All you have to do now is click on "Completed" to return to the main menu.


As you can see once back home, the temperature and humidity increase is automatic. The temperature is not the same as in the kitchen but I had it in my hand so the reading is distorted.

When you click on the Aqara temperature sensor you can see the value displayed in two ways:
  • Either a direct reading with temperature and humidity displayed.
  • Either via the representation of a gauge that is much more aesthetic with the mini and maxi via its predefined temperature and humidity range.

What I also appreciate is the possibility of having a history tracking table, both the temperature and the humidity rate, which goes up really well, as shown in the photo below.

The green curve represents the temperature while the blue one represents the humidity level.

It will also be possible to have a visualization on the current day, week or month.

Conclusion
As we can see, this Aqara temperature sensor perfectly meets my requirements, whether it is under the Mi-Home application or under Jeedom, with which it is perfectly integrated. With different scenarios, it can improve the via in the house as you can see with my scenario which is really very simple to implement so no more worries about having fog all over the bathroom.

Given the reactivity and precision of the sensors, I think I recommend a few more to put them in different strategic locations.

Smart Lilo: the smart vegetable garden

Autor smartai | 29 Nov, 2018
The Ready to Grow brand offers a connected indoor vegetable garden, called Lilo. The vegetable garden is composed of three compartments, which accommodate capsules sown with previously chosen seeds: basil, sunflower, mint, pepper... A lamp allows the plants to develop properly, even indoors, and an application (My Lilo) accompanies you throughout the growth. Let's do the Lilo test.
  • Brand: Ready to Push
  • Category: Connected vegetable garden
  • Connectivity: Bluetooth
  • Compatibility: Android / iOS
  • Price: 99.95€ the vegetable garden / 5.95€ the capsule
  • Availability: Available
  • Tested with: Samsung Galaxy S5
Unboxing by Lilo: a vegetable garden safely connected in its box
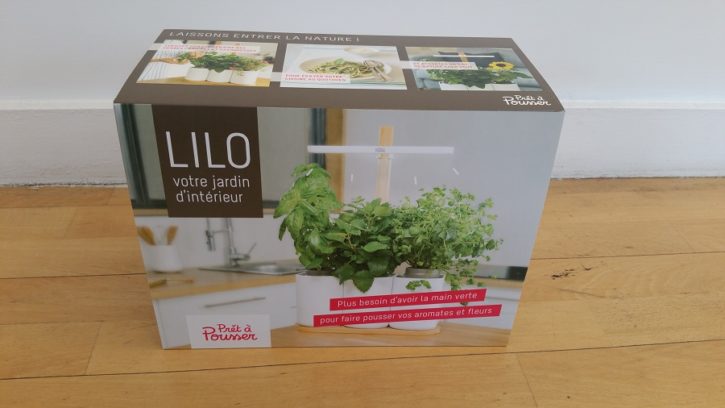
Lilo was delivered with three capsules: chives, lemon balm and lemon basil. The vegetable garden box is covered with an overwrap bearing a photo of a well stocked Lilo, and the brand name. The packaging is friendly and promises to brighten up your daily cooking, to bring an island of nature to your home.
lilo
Once the overwrapping is removed, everything is much easier. The recyclable cardboard retains its original brown colour: only the brand, product name and logo are printed on the sides, in brown varnish.

The contents of the box are limited to the vegetable garden and the leaflet, which welcomes us with a colourful "Hello! The various elements of the vegetable garden are perfectly fixed by cardboard boxes: the lamp is inserted in a thick piece to its dimensions, the floats of the pots are fixed by cardboard strips. All this doesn't move a muscle, it's a well-made, very protective packaging.

The capsules that will accommodate the aromatic plants are delivered separately, in individual boxes. On the faces, the name of the plant, a description of the plant, a suggestion for use... Simple, the box holds the capsule well as well as the seed and nutrient sachets.

Using Lilo: absolute simplicity
The use of Lilo is as simple as it gets. It is written on the packaging of the vegetable garden: "No need to have a green thumb to grow your herbs and flowers". Indeed, it is complicated to make it simpler.

The assembly of the connected vegetable garden is easy: the different parts are assembled in a logical way and an installation guide is in the box (and on the application) to help in case of doubt. Once Lilo is assembled, simply fill the three containers with water and put the capsules in them.

This is perhaps the most technical part of the installation. You have to put the seeds, which are in a bag, in the capsule. Then, the capsule must be placed in the receptacle that floats on the water in the tank. There you go. About twenty choices of seeds are available: aromatic herbs, flowers and infusions. Their price ranges from 5.95 to 6.90€.
test lilo
There is only one thing left to do: wait for it to grow. And it grows fast! After one week, the results are already widely visible. Nothing that can't be eaten right now, but it's very promising and really surprising.

Design and ergonomics: pretty enough to decorate your living room
The connected Lilo vegetable garden is very pleasant to the eye. The base and rod that supports the LEDs are made of wood, the rest is made of beige or brown plastic. The whole is homogeneous, simple: simply charming. More than a vegetable garden, it is also a decorative element that will have its place in the living room, bringing greenery and light.

The lamp (the only part of the product on which the brand appears) is composed of 21 low-power LEDs. According to the brand, Lilo consumes "half as much as your Internet box". It is at the luminaire level that the black spot of the connected vegetable garden is located. LEDs are visible, which is not necessarily very aesthetic. This is not very serious, because we don't often look at the underside of the lamp, but a cover on the LEDs would have given a more worked and finished side to the product.

The white power cable - which connects to the lamp - passes through two locations, one at the base of the vegetable garden, the other at the lamp. This allows it to be hidden. It's nice to have a discreet cable that's not totally visible.

Lilo is a cleverly made product. The capsule that receives the seeds is installed in a float on the water of the containers. Thanks to this arrangement, the plant can draw water when it feels the need. When the float level drops a little too low, water is added again.

The capsules are biodegradable, so it is possible to integrate them into your compost once the growth is complete (after 3 / 4 months of use). Finally, it should be noted that the connected Lilo vegetable garden is entirely "Made in France": buying a pretty vegetable garden is good; a pretty French vegetable garden is better. That's the way it is.